
Replacing a toilet flange is an essential task in maintaining the functionality and hygiene of your bathroom. A faulty flange can cause leaks and wobbling, leading to potential water damage and an unstable toilet. This guide provides a comprehensive overview of the process, ensuring you can carry out the replacement effectively and efficiently.
What is a Toilet Flange?
A toilet flange, also known as a closet flange, is a pipe fitting that connects the toilet to the floor and the drainpipe. It ensures a secure and sealed connection, preventing leaks and maintaining the toilet’s stability.
Common Issues with Toilet Flanges
Toilet flanges can deteriorate over time due to wear and tear, corrosion, or improper installation. Common issues include leaks, cracks, and a loose toilet, which necessitate flange replacement.
Preparing for the Replacement
Gathering Necessary Tools and Materials
Before starting the replacement process, gather all necessary tools and materials. You will need:
- A new toilet flange
- Wax ring or rubber gasket
- Adjustable wrench
- Screwdriver
- Putty knife
- Hacksaw (if needed)
- Cleaning supplies
Safety Precautions
Ensure you turn off the water supply to the toilet and drain the tank and bowl completely. This will prevent any accidental spills and make the process smoother.
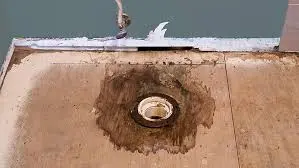
Removing the Old Toilet Flange
Disconnecting the Toilet
First, disconnect the toilet from the water supply and flush it to remove as much water as possible. Use a sponge or towel to soak up any remaining water in the bowl and tank.
Removing the Toilet
Unscrew the bolts securing the toilet to the floor and carefully lift the toilet off the flange. Place it on a protective surface to avoid damage.
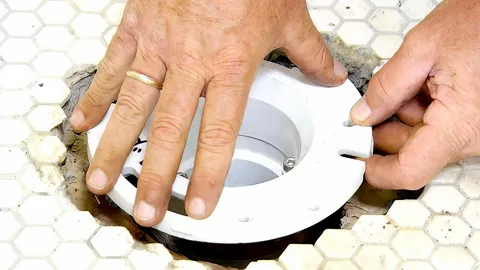
Detaching the Old Flange
Use a screwdriver or wrench to remove the screws holding the old flange in place. If the flange is glued or cemented, you may need a hacksaw to cut it out. Clean the area thoroughly to ensure a smooth installation of the new flange.
Installing the New Toilet Flange
Choosing the Right Flange
Select a new flange that matches the size and type of your old one. Flanges come in various materials, such as PVC, ABS, and cast iron, so choose one that suits your plumbing system.
Positioning the Flange
Place the new flange over the drainpipe, ensuring it sits flush with the floor. Secure it with screws, making sure it is tightly fastened to prevent any movement.
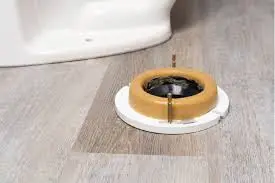
Sealing the Connection
Place a new wax ring or rubber gasket on the flange. This will create a watertight seal between the toilet and the flange, preventing leaks.
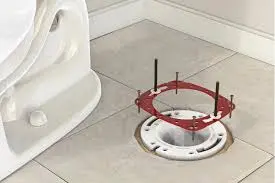
Reinstalling the Toilet
Positioning the Toilet
Carefully lift the toilet and align it with the flange bolts. Lower the toilet onto the flange, ensuring it sits evenly on the wax ring or gasket.
Securing the Toilet
Tighten the bolts gradually and evenly to secure the toilet to the floor. Be cautious not to overtighten, as this can crack the porcelain.
Reconnecting the Water Supply
Reconnect the water supply line to the toilet and turn on the water. Check for any leaks around the base of the toilet and the flange connection.
Testing and Final Steps
Flushing the Toilet
Flush the toilet several times to ensure it is functioning correctly and there are no leaks. If you notice any issues, check the flange connection and tighten the bolts if necessary.
Cleaning Up
Clean the surrounding area and dispose of the old flange and any debris properly. Ensure the bathroom is tidy and everything is in its place.
Additional Tips and Considerations
Toilet Flange Repair Plumbing and Mechanical
When performing a toilet flange repair plumbing and mechanical task, always follow proper procedures and safety guidelines. Using the right tools and techniques will ensure a successful repair and prevent future issues.
Horizontal to Horizontal Drain Connection
In some cases, you may need to address a horizontal to horizontal drain connection during the flange replacement. Ensure the connections are secure and properly aligned to maintain efficient drainage.
P&M Magazine
For more detailed guides and expert advice on plumbing and mechanical systems, consider subscribing to P&M Magazine. This publication offers valuable insights and tips for homeowners and professionals alike, helping you stay informed about the latest industry trends and best practices.
Conclusion
Replacing a toilet flange is a straightforward yet crucial task for maintaining a functional and hygienic bathroom. By following this guide, homeowners can ensure a successful flange replacement, preventing leaks and ensuring the stability of their toilets. Remember to gather the necessary tools, follow safety precautions, and take your time to complete each step carefully. With proper maintenance and attention to detail, your bathroom will remain in excellent condition for years to come.